Toilet Found! is sustained by readers who made purchases through specific links on this site. Learn more
Toilet Keeps Running? 7 Easy Fixes That Stop the Problem Fast

A Running Toilet Can Cost You Money and Make You Feel Guilty
That constant toilet running sound costs you $35+ monthly in wasted water. Before you call a plumber for $150+, try these 7 fixes that solve 95% of running toilet problems. Most take under 10 minutes and cost less than $10. Stop the water waste today.
Table of Contents
show
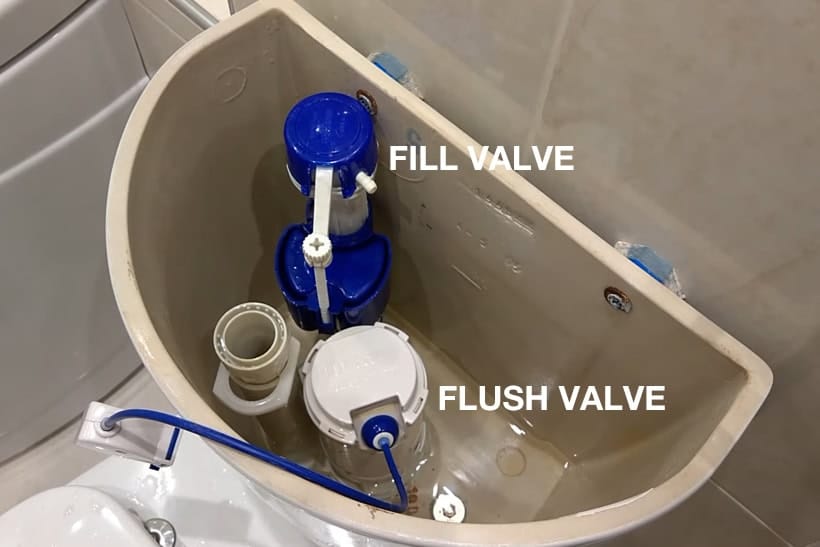
Why Your Toilet Keeps Running
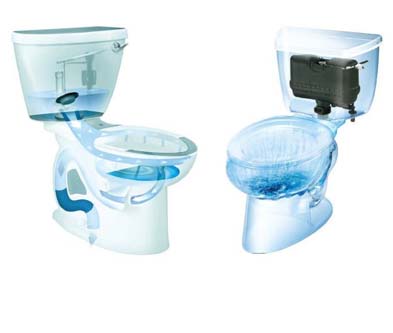
Your toilet keeps running because something prevents the flapper from sealing properly or stops the fill valve from shutting off. Understanding basic toilet mechanics helps you identify the problem quickly.
Most running toilets cause breakdowns like this:
Flapper chain issues cause 40% of running toilet problems. The chain connects your flush handle to the rubber flapper at the bottom of your tank. When the chain is too tight, it holds the flapper open. When too loose, the flapper won’t lift during flushing.
Warped or damaged flappers account for 25% of cases. Rubber flappers warp over time, creating gaps that let water leak continuously from the tank into the bowl.
Incorrect water levels cause 20% of running toilets. When water rises above the overflow tube, it creates a constant drain that triggers the fill valve to keep running.
Float adjustment problems represent 10% of cases. The float tells your fill valve when to stop filling. Incorrect positioning causes continuous running.
Fill valve failure happens in 5% of situations. When internal parts wear out, the valve won’t shut off properly, requiring replacement.
When to DIY vs Call a Professional: Attempt these fixes if you’re comfortable removing a tank lid and working around water. Call a plumber if you discover cracked tanks, loose toilet bolts, or complex internal damage. Most repairs take 2-20 minutes with basic tools.
Fix 1: Check the Flapper Chain
Start with the most common cause. Chain problems are easy to spot and fix without any tools.
How to Identify Chain Problems
Remove your toilet tank lid carefully – it’s heavy and fragile. Set it on a towel on your bathroom floor. Look inside the tank for the chain connecting the flush handle arm to the rubber flapper.
Chain too tight: The flapper stays partially open, letting water flow continuously. You’ll see a gap between the flapper and its seat.
Chain too loose: Extra chain coils at the tank bottom. The flush handle feels loose or doesn’t flush properly.
Step-by-Step Chain Adjustment
Success rate: 40% of running toilet problems
- Locate the chain connection points. Find where the chain attaches to the flush handle arm and the flapper.
- Check current chain length. Proper chain length allows slight slack when the flapper is closed – about half an inch of bow in the chain.
- Adjust the chain. Unhook the chain from the flush handle arm. Move the connection point up or down to achieve proper slack.
- Test the adjustment. Replace the tank lid and flush several times. The flapper should close completely and lift easily during flushing.
- Fine-tune if needed. If the flush is weak, shorten the chain slightly. If the toilet still runs, lengthen it a bit.
Common Chain Mistakes to Avoid
When Chain Replacement Is Needed
Replace the chain if you notice rust, broken links, or stretched metal. Hardware stores sell universal toilet chains for $2-5. Installation follows the same process as adjustment.
Pro tip: Take a photo before making adjustments so you remember the original setup if you need to backtrack.
Fix 2: Replace a Warped Flapper
Rubber flappers warp over time, especially in areas with hard water or when drop-in toilet bowl cleaners are used. But before you go and get the replacement flapper, make sure to check the original flapper type or dimension, like the video suggests. It will save you the frustration and time.
Identifying a Warped Flapper
Success rate: 25% of running toilet problems
Cost: $3-8 for replacement flapper
Look for these signs of flapper problems:
Visible warping: The flapper appears bent, curved, or doesn’t lie flat against its seat.
Mineral buildup: Hard water deposits prevent proper sealing.
Soft or dissolving rubber: Chemicals break down rubber over time.
Poor flexibility: The flapper feels stiff or cracked when touched.
Step-by-Step Flapper Replacement
- Turn off the water supply. Locate the shut-off valve behind your toilet and turn clockwise until tight.
- Flush to empty tank. Hold the handle down to remove as much water as possible.
- Remove the old flapper. Unhook the chain and lift the flapper off its hinge posts. Some flappers have ears that hook over posts; others slide onto a ring around the flush valve.
- Clean the flapper seat. Wipe away mineral deposits or debris from the area where the flapper seals.
- Install the new flapper. Match the connection style of your old flapper. Ensure the flapper centers properly over the seat.
- Reconnect the chain. Attach the chain with slight slack as described in Fix 1.
- Turn the water back on. Open the shut-off valve and let the tank refill.
- Test the installation. Flush several times to verify proper sealing and operation.
Flapper Selection Tips
Universal flappers fit most toilets and cost $3-5. Check the packaging for compatibility with your flush valve size (usually 2 or 3 inches).
Brand-specific flappers ensure a perfect fit but cost more ($6-8). Bring your old flapper to the hardware store for matching.
Adjustable flappers work with various chain lengths and provide better sealing for older toilets.
Fix 3: Adjust Water Level
An incorrect water level causes continuous running when water flows over the overflow tube or sits too low for proper operation.
Proper Water Level Identification
Success rate: 20% of running toilet problems
The correct water level sits about one inch below the rim of the overflow tube. Look for a water line mark inside your tank – this shows the manufacturer’s recommended level.
Water too high: Flows over the overflow tube, creating constant drainage and refilling.
Water too low: Prevents proper flushing and may cause the toilet to run intermittently.
Water Level Adjustment Methods
For ball float systems:
- Locate the float arm. Find the metal rod connecting the round float ball to the fill valve.
- Bend the arm. Bend down to lower the water level, and up to raise it. Make small adjustments.
- Test the level. Flush and observe the final water level after refilling stops.
For cylinder float systems:
- Find the adjustment screw. Look for a screw at the top of the fill valve mechanism.
- Turn clockwise to lower the water level, counterclockwise to raise it.
- Make small adjustments. Quarter turns prevent over-correction.
Verification method: The water should stop rising when it reaches the proper level, and the fill valve should shut off completely.
Fix 4: Adjust the Float
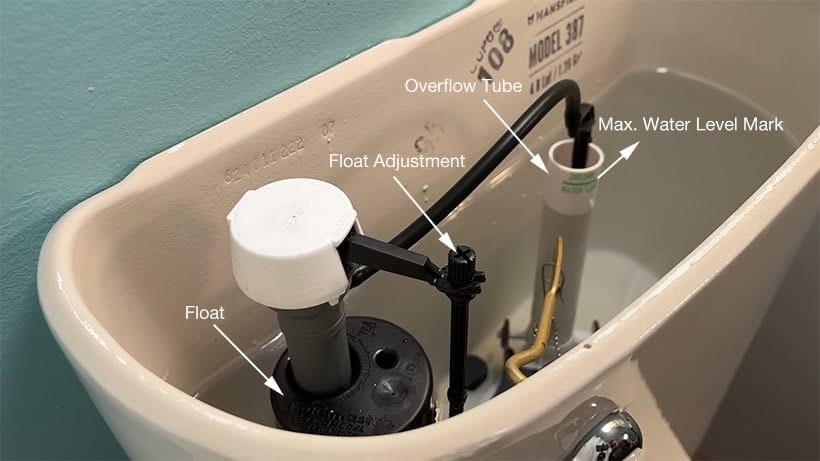
Float positioning tells your fill valve when to stop filling the tank. Incorrect adjustment causes continuous running or poor flushing. The key is to ensure that only water from the fill valve can get into the bowl via the overflow tube.
The float, regardless of type, should stop the water level in the tank at about an inch below the overflow tube opening.
The video above explains how to adjust the float position to avoid overflowing, which causes the toilet to run.
Float Types and Adjustment
Success rate: 10% of running toilet problems
Ball float adjustment: The round ball float rises with the water level. If positioned too high, it won’t trigger the fill valve to shut off early enough.
- Check float position. The ball should sit freely on the water surface without binding against the tank walls.
- Adjust the float arm angle. Bend the metal arm to change when the fill valve closes.
- Clear obstructions. Ensure the float doesn’t catch on other tank components.
Cylinder float adjustment: The cylindrical float slides up and down a central shaft connected to the fill valve.
- Locate the adjustment clip or screw. Most have a spring clip or screw mechanism.
- Move the float position. Lower position = lower water level, higher position = higher water level.
- Test adjustment. Flush and verify proper water level and fill valve shutoff.
Float Troubleshooting
The waterlogged ball floats partially and won’t shut off the fill valve. Replace if the ball contains water.
The binding cylinder floats and sticks on its shaft due to mineral buildup. Clean the shaft and float mechanism.
Bent float arms prevent proper operation. Straighten carefully or replace if cracked.
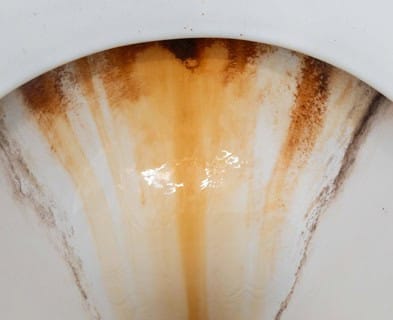
Fix 5: Clean Mineral Buildup
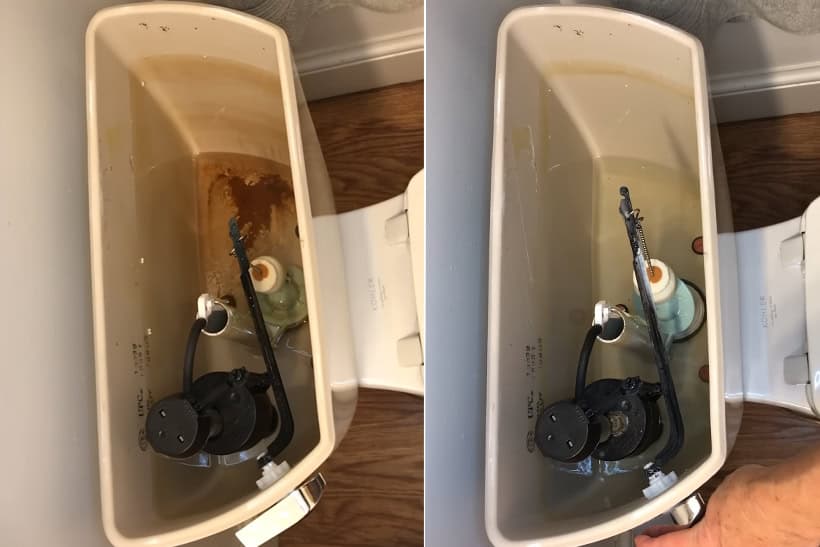
Hard water deposits interfere with proper toilet operation, preventing a complete shut-off and causing intermittent running.
Identifying Mineral Deposits
Look for white, chalky deposits on:
- Flapper seat and flapper bottom
- Fill valve components
- Float mechanisms
- Chain connection points
Cleaning Procedures
For flapper seat cleaning:
- Turn off the water and flush to lower tank level.
- Scrub gently with a pumice stone to remove deposits without scratching porcelain.
- Rinse thoroughly to remove loose particles.
For fill valve cleaning:
- Remove the fill valve cap (usually twists off).
- Flush out debris by turning the water back on briefly.
- Scrub components with an old toothbrush and vinegar.
- Reassemble and test the operation.
Prevention Tips
Fix 6: Replace Fill Valve
When internal fill valve components wear out, the valve won’t shut off properly despite correct water levels and float adjustment.
When Fill Valve Replacement Is Necessary
Cost: $15-25 for a new fill valve
Success rate: Fixes the remaining 5% of problems
Replace your fill valve if:
- Water continues running after all previous fixes
- The valve makes constant humming or whistling sounds
- Water flow doesn’t stop even with a proper float position
- Internal valve parts are cracked or corroded
Step-by-Step Fill Valve Replacement
- Turn off the water supply at the shut-off valve behind the toilet.
- Flush and remove remaining water. Use a sponge or cup to remove water from the tank bottom.
- Disconnect the water supply line. Use an adjustable wrench to loosen the nut connecting the supply line to the bottom of the fill valve.
- Remove the old fill valve. Unscrew the large nut under the tank that holds the fill valve in place. Lift out the old valve.
- Install the new fill valve. Insert the new valve and tighten the mounting nut hand-tight plus a quarter turn with a wrench.
- Reconnect the water supply. Attach the supply line and tighten the connection.
- Adjust height and water level. Most new valves have adjustable height and water level settings.
- Connect the flapper chain to the new flush mechanism if required.
- Turn the water back on and test operation through several flush cycles.
Fill Valve Selection
Universal fill valves fit most toilets and include adjustable components for different installations.
Fluidmaster 400 series is a reliable, widely compatible option available at most hardware stores.
Korky QuietFILL valves reduce refill noise – good for bathrooms near bedrooms.
Fix 7: When Professional Help Is Needed
Some toilet problems require a plumber’s expertise and specialized tools.
Signs You Need a Plumber
Cost expectation: $150-300 for professional diagnosis and repair
Call a professional plumber when you discover:
Cracked toilet tank or bowl: Requires complete toilet replacement, not repair.
Loose toilet bolts: The toilet rocks or moves, indicating wax ring or flange problems.
Multiple simultaneous problems: Several failing components suggest age-related replacement needs.
Water damage around the toilet base: Indicates leaking that requires immediate professional attention.
Continuous problems after trying all fixes: Internal damage or incompatible parts need expert diagnosis.
Finding Qualified Plumbers
Get multiple quotes for major repairs or toilet replacement.
Verify licensing and insurance before hiring any contractor.
Ask about warranties on parts and labor for toilet repairs.
Check reviews from recent customers for reliability and quality of work.
When DIY Isn’t Worth the Risk
Some toilet repair situations carry risks that outweigh potential savings from DIY fixes.
Old or vintage toilets may have non-standard parts requiring specialized knowledge. Toilets manufactured before 1994 often use unique components no longer available at hardware stores. Forcing the wrong parts creates expensive damage.
Shared-wall plumbing in condos or apartments needs careful handling to avoid neighbor damage. Water shutoff valves may control multiple units. Mistakes with supply lines affect adjoining properties and create liability issues.
Complex internal mechanisms in high-end toilets often require manufacturer-certified service. Smart toilets, pressure-assist models, and commercial-grade units have specialized parts and calibration requirements beyond typical DIY skills.
Limited experience with plumbing repairs increases the risk of water damage, especially when working with supply line connections. Water damage from toilet repairs costs thousands more than professional service calls.
Prevention Tips for Future Problems
Regular maintenance prevents most running toilet issues and extends your toilet’s lifespan. Simple monthly checks catch problems before they waste water and money.
Avoiding harmful products protects internal components from premature failure. Understanding your water quality helps you adjust cleaning schedules and replacement timing.
These prevention strategies eliminate 80% of future toilet problems and save hundreds in emergency repair costs.
Monthly Maintenance Checklist
Products to Avoid
Drop-in toilet bowl cleaners contain chemicals that deteriorate rubber components and cause premature flapper failure.
Brick or bottle displacement devices interfere with proper flushing and can damage internal mechanisms.
Harsh chemical cleaners damage rubber and plastic toilet components over time.
Water Quality Considerations
Hard water areas need more frequent cleaning and component replacement due to mineral buildup.
Well water may contain sediments that clog the fill valve mechanisms faster than city water.
Water softeners reduce mineral deposits but may require different cleaning products.
Replacement Schedules
Flappers: Replace every 3-5 years or when warping occurs.
Fill valves: Usually last 7-10 years with normal use.
Chains: Replace when corroded or stretched, usually every 5-7 years.
Complete toilet: Consider replacement after 15-20 years or when multiple components fail simultaneously.
Frequently Asked Questions
How much water does a running toilet waste? A continuously running toilet wastes 200+ gallons daily, costing $35-50 monthly depending on local water rates. Even intermittent running wastes 20-40 gallons daily.
Is it safe to turn off the water overnight if my toilet keeps running? Yes, turning off the shut-off valve prevents water waste overnight. Turn it back on when you wake up. This temporary fix works while you plan repairs.
What if multiple fixes are needed? Start with the easiest fixes first. Often, one problem causes others – fixing a warped flapper may solve chain issues too. If multiple major components fail, consider complete toilet replacement.
Can I use the toilet while making these repairs? Most fixes require turning off the water temporarily. Plan repairs when bathroom access isn’t critical, or use a different bathroom during repairs.
How do I know which flapper to buy? Bring your old flapper to the hardware store for matching, or buy a universal flapper that adjusts to fit most toilet types. Check your flush valve diameter (usually 2 or 3 inches).
Stop the Water Waste Today
These 7 fixes solve 95% of running toilet problems without calling a plumber. Start with the flapper chain adjustment – it fixes 40% of cases in under 2 minutes. Work through each solution systematically until you find the cause.
Most repairs cost under $10 and prevent $35+ monthly water waste. The money you save in the first month pays for replacement parts several times over.
Remember: turn off the water supply before making repairs, take photos before disassembly, and don’t hesitate to call a professional if you discover cracked components or multiple system failures.
Your toilet should operate silently between uses. If you still hear running water after trying these fixes, the problem likely requires professional diagnosis or toilet replacement.
Disclaimer: The numbers shown in this article are ballpark figures. Your actual costs and water use can be higher or lower depending on your toilet and local rates.